
Weber-Weber Chicken Dinner
- Howie Bulka

- Jul 28, 2025
- 11 min read
Updated: Jul 28, 2025

The Weber Kettle
While America’s culinary history is resplendent with stories of individuals of boundless skill, passion, and creativity, I would like to dedicate the July Recipe of the Month to George Stephens, a man whose contribution to the American culinary experience is as immeasurable as it is unacknowledged.
In the 1950s, George Stephens, a sheet metal worker, was an employee of Weber Brothers Metal Works. Little historical record is left of his travails, so we can only imagine the desires that drove him to his destiny...
Click to read the rest of Howie's Missive on the Weber Kettle⬇️
Some believe he was just a tinkerer. To others, he was a dreamer looking to turn a warehouse full of swords into plowshares, so to speak. Or perhaps he just liked BBQ. Wood smoke and pig parts have led many a man to greatness. Whatever the inspiration, one fateful day, acetylene torch in hand, George took one of the maritime buoys made for the war effort, cut it in half, fabricated a handled lid and a three-point stand, and then put his newly made appliance to work.
His co-workers called it ‘Sputnik’ and other derisive names. Surely, they had much fun at his expense. But like all works of culinary genius, the proof is ultimately on the plate, and soon the skeptics were convinced. The grill had a vented cover, so the food got smoked, not the cook. A simple sliding sheet metal flap allowed for subtle adjustment to the airflow over the charcoal, and hence, the internal temperature could be controlled. The unusual spherical shape cooked food evenly from all directions. A whole turkey could now be cooked without a rotisserie. George Stephens’s dogged determination and uniquely American ingenuity led to the creation of what the world has come to know as the Weber Kettle. The first Weber-Stephens Kettle Grill, strikingly similar in appearance to today’s models, went on sale in 1952. The rest, as they say, is history.
If you don’t own a Weber Kettle, or if yours lies rusted like old farm equipment in some overgrown corner of your side yard, I highly recommend you purchase one. It can be your ‘other’ grill, in the same way some people have their ‘other’ car, usually a sweet little roadster, for occasions when living life to its fullest requires something with a little more octane. The Weber’s simplicity is reflected in its price. The Original Weber Kettle grill can be yours for the low price of $150. It’s a fine machine, but I recommend the ‘Premium Weber Kettle,’ which includes a hinged grill, a thermometer, and the ash catcher for just fifty dollars more.
Cooking on the Weber Kettle can be a deeply satisfying experience. Not just because playing with fire is fun, but because we humans have an inherent affinity for live fire cooking. The Weber provides a civilized way to immerse oneself in the mysteries of fire, smoke, and ash, and thereby connect with things primal. For most of human existence, lighting a fire was synonymous with survival. Starting and keeping fire was, for eons, a rite of passage, and it remains an archetypical symbol of home and hearth, warmth and comfort. Most of us can reminisce fondly about some magical moment sitting around a campfire, cooking dinner, sharing stories, or just looking at the stars. And some of us can remember smoking cigarettes, which is, in essence, an intimate act of taking fire into one’s body. Fire belongs exclusively to the human species. It is the tool with which we civilized ourselves, separated ourselves from the wild things. Wrestling with fire, even when it’s just in a kettle grill, makes us feel more human—reminds us that we are human. We need that now.
When we lose touch with our primal selves, we become untethered, easily seduced by purveyors of convenience and the promise of improved social status attainable with the next miraculous technology. We have become easy marks, if not lambs for the slaughter, eager to adopt new technologies without the slightest consideration of the consequences.
So, with many long, hot days of summer still ahead of us, I hope I have inspired you, dear reader, to gather your friends and family around the picnic table and light a big ass fire in your Weber Kettle. While you’re there, consider a simple truth: things that make us more human make us more happy.
Weber-Weber Chicken Dinner
In our July Recipe of the Month, we will depart from our usual format and challenge you, dear reader, to test the limits of your culinary prowess. I offer a well-considered collection of tips, tricks, recipes, photographs and strategic advice, all useful in the preparation of “Weber-Weber Chicken Dinner.”


Menu
Barbecue Chicken / Carolina Gold BBQ Sauce
Potatoes in Drippings
Purple State Salad (Radicchio with Hot Bacon Dressing)
Recipes List
Weber Roasted Chicken
Carolina Mustard Sauce
Cajun Spice Blend
Purple State Salad
Potatoes in Drippings
Holy Oil
Tools and Equipment
1 Weber Kettle BBQ
1 Chimney Type Fire Starter
1 Cast Iron Skillet (to cook bacon on the grill)
1 Bag Charcoal Briquettes, 8 lbs
2 Aluminum Disposable 1/2 Hotel Pan (10 x 13) or similar
1 Half Sheet Pan (18 x 13) or similar
1 Digital Scale
1 Poultry Shears
1 Instant Read Probe Thermometer (optional)
Ingredients: Dry Goods, Produce, Protein
Dry Goods
French’s mustard
Distilled white vinegar
Honey
Brown sugar
Worcestershire
Olive oil
Red wine vinegar
Packaged croutons
Tabasco
Salt
Black pepper
Garlic powder
Cumin
Cayenne
Paprika
Dry oregano (or Italian seasoning)
Chili flake (crushed red chili)
Ingredients - Produce
8 large Russet potatoes
2–3 heads Radicchio
2 bunch chives or 1 bunch green onion
1 bulb garlic
Meat and Poultry
2 chickens (4–5 lbs. fryers)
8 eggs
1/2 lb. butter
1 lb. bacon, sliced thin
Other Things to Consider
Appetizer
Beverages
Dessert
Table Bread
Plan of Attack (Cooking Instructions)
Before
Clean your Weber. Inside and out, top to bottom. Empty the ashes. Clean the
grill.
Check out the Tools and Equipment list. Get what you need.
Check your spice drawer. You probably have some of what you need
Two Days Before
Buy Groceries
Make the Carolina Mustard Sauce
Hard Boil Eggs
Make the Cajun Spice Blend
Make the Holy Oil
One Day Before
Blanch Potatoes / Set up
Spatchcock chickens
Crush Croutons
Mince Chives / Green Onion
Chop Hard Boiled Eggs
Chill Beverages / Make Ice
The Day of
Set the table
Cut Radicchio
Season Chickens
Set up Salad (bacon goes on later at the table), Refrigerate
Two Hours Before
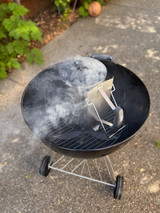
Start The Fire
One Hour Before
Distribute Coals
Place Potatoes on Bottom Grill
Place Top Grill / Rub with Oil
Place Chickens on Grill
Close Cover / Top Vents open all the way / Bottom Vents open all the way
One hour later
Temp The Bird / Baste with Holy Oil
Cook the bacon until crisp over hot coals. Remove bacon, chop and return to
pan. Hold cooked bacon aside until ready to dress salad.
When the Bird is Cooked
Remove the birds to a sheet pan. Cover with Foil.
Remove Potatoes / Finish Potatoes / Hold in low oven or ready to microwave
Place Salad (do not toss) and BBQ Sauce on the table
At Time of Service
Reheat Potatoes / place on the table
Cut chicken into portion pieces (or carve at the table) / Place on the table
Put bacon (and grease) over the coals and cook until sizzling.
When guests are seated carefully pour hot bacon (and grease onto the salad.
Toss.
Dinner is served.
Weber Roasted Chicken
Yields 2 Birds / Serves 6-8
2 Ea. Chickens (4-5 lbs. Fryers)
6-8 Tbl. Cajun Spice Blend


Spatchcock the birds (see photos above).
Refrigerator space permitting, place the birds side by side, skin side up on a ½
sheet pan. Refrigerate uncovered until time of cooking. One or two days is best.
If that’s not practical, simply store the chickens in the refrigerator in a closed
container.
A couple of hours before cooking, remove the birds from the refrigerator. The
chicken will cook better from room temperature.
Season the chickens with the Cajun Spice Blend, using 3-4 tablespoons of the
Seasoning on each bird. Season the top and bottom sides evenly. No need to
“rub’ the seasoning into the skin. Set aside until cooking time.
Two hours before serving time, prepare your fire starter; Place a wad of crumpled
newspaper sheets in the lower portion, place the starter in the center of the
bottom grill and fill the chimney to the brim with charcoal briquettes (app. 6
pounds). Light the paper.
30-45 minutes later, when the fire is ready, the coal on the top of the starter will
have ashen (gray) corners and red flame will be visible in the chimney’s middle
section.
Pour the coals out of the Chimney starter onto the grill as shown. Use tongs to
make the pile compact and tidy. Position the pan of potatoes (see photo) or any
other additional apparatus now. Place the top grill.
Place the chickens on the grill as shown. Cover the Kettle. Top vents should be open all the way. Bottom vents should be open all the way, come back in an hour.

Open the lid. Chicken should kind of look like roast chicken. Test temperature.
165 F at the thick part of the thigh is fully cooked. If not cook it more.
When fully cooked Remove the birds to a sheet pan. Brush liberally with Holy Oil.
Cover with Foil. Allow to rest at least 15 minutes before cutting into serving size
(8-10) pieces, or if you plan to carve at the table, leave them be.


Carolina Mustard Sauce
Yield app. 3 cups
240 g French’s mustard
120 g Distilled White vinegar
100 g Honey
45 g Light brown sugar
25 g Worcestershire sauce
15 g Tabasco
1 ½ Tsp Salt
1 Tsp Black pepper
Whisk together all Ingredients in a saucepan.
Bring the mixture to a boil over medium heat, stirring occasionally.
Remove the sauce from heat. Cool to room temperature.
Once cooled, transfer the sauce to closed container. Refrigerate for at least an
hour, or preferably overnight, to allow the flavors to meld.
The sauce can be stored in the refrigerator for up to 2 weeks.
Cajun Spice Blend
Yield app. 1 cup
10 Tbl Salt
3 Tbl Garlic Powder
1 Tbl Black Pepper
1 Tbl Cumin
½ Tbl Cayenne
3 Tbl Paprika
Combine all ingredients.
Store in a covered container.
Weber Mashed Potatoes
Yield 8 Servings
8 large Russet Potatoes, peeled and diced ½ inch thick
A bit Olive oil or nonstick spray
4 Oz. Butter
To Taste Salt and Pepper
Blanch the potatoes in salted water until fully cooked but not falling apart.
Place the potatoes in a lightly oiled Aluminum Disposable ½ hotel Pan (10 x 13)
or similar. Hold covered in the refrigerator until cooking time.
One hour before service, place the potatoes on the bottom grill as shown.

When the chicken are taken off the grill, lift off the top grill and remove the pan of
potatoes. Replace the top grill (to cook the bacon for the salad).
While the potatoes are still hot, add a stick of butter and mash the potatoes,
smoothly or roughly as you prefer.
Season with salt and pepper.
Hold for service in a slow oven or remove to a microwave safe bowl, ready to
reheat for service.
Note: Cooking time for the potatoes will be about an hour, roughly the same as it takes to cook the chicken. As the chicken cooks, the drippings will fall onto the potatoes and make them yummy.
Blue State Salad
Yields 6-8 servings
3 Heads Radicchio (to yield 10 cups)
12 Hard Boiled Eggs
2 Cups Crouton Crumbs
2 Bunch Chives or 1 Bunch Green onion
1 Lbs. Bacon, sliced
Olive oil
Red Wine Vinegar
Salt and Pepper
Quarter and core the radicchio. Cut it into ribbons, ¼- ½ inch thick. Hold for
service.
Chop the hard-boiled eggs. A food processor works well for this. Hold for service.
Crush or chop the croutons into coarse crumbs. A food processor also works well
for this. Hold for service.
Mince the chives or green onion. Hold for Service.
Just before serving the salad, cook the sliced bacon until crisp. Chop the bacon
and reserve it in the pan with rendered bacon fat.

About an hour before service, place the radicchio into a large salad bowl.
Add a big pinch of salt and pepper and about ¼ cup of olive oil. toss well to
combine.
Now toss the radicchio with a bit of red wine vinegar. Do this little by little, tasting
the radicchio until it has a bitter and sour balance. Adjust salt and pepper.
Pile the eggs, crouton and chives on top, but don’t toss the salad.
At time of service, when your guests are at the table, reheat the chopped bacon
(and the bacon fat) and pour it (carefully) over the salad.
Toss and serve.


Holy Oil
Yield 2 cups
1 cup Olive oil
½ cup Canola Oil (or other neutral oil)
10 Cloves of Garlic, very coarsely chopped
1 stick Butter, salted or unsalted
Pinch Chili Flake
Pinch Dry Oregano
Place the olive oil, canola oil and garlic into a small saucepan.
Cook over a low heat until garlic begins to sizzle, turning slightly brown on the
edges.
Off the heat add the remaining ingredients. Stir to incorporate butter. Allow to
cool to room temperature.
Place it into a covered container.
Refrigerate.
Notes: When using the Holy oil to baste the chicken, leave the chunks of garlic
behind. They will have fallen to the bottom of the container, so it’s easy to do. Also, You can use the remaining Holy oil to make garlic bread. Simply cut loaves of French bread or baguette in half horizontally, lay them out on a pan and slather them (really soak) with the holy oil. Again, leave the chunks of garlic behind. Bake at 400 F for 20-30 minutes until Golden Brown. Just Sayin’...
Notes from Howie
The Weber Kettle is a marvel of utility, but it reminds us that cooking is a craft. Like any craft, it requires the mastery of technique, and of oneself, that only comes with practice. There are as many tips and tricks to using the Weber Kettle as there are Weber enthusiasts. The internet is full of short instructional videos that unravel the mysteries of live fire cooking. I would also suggest “Weber’s Big Book of Grilling.” Published in 2001, it remains the best cookbook for backyard barbecue ever written. Truly. It is full of smart recipes.
The Two Zone Method
There are two ways to cook food on a backyard grill. Food can be cooked directly over hot coals or food can be cooked indirectly in the ambient heat of the chamber (Kettle) without being placed directly over the hot coals. You can think of the ‘direct method’ as quickly grilling and the ‘indirect method’ as slowly roasting. Every turn at the grill will likely require a mix of both methods.
So, how does one make this two-method thing happen? Turns out there’s a well-worn technique in the Weber canons that makes it all simple as pie. The technique is known as the ‘Two Zone Method’.
The Two Zone Method instructs you to simply arrange the hot coals such that one half (or less) of the grill’s cooking surface has hot coals underneath it. Cooking directly over the hot coals is an excellent way to sear meat, fish or poultry, or you can move your animal protein to the other zone away from the hot coals, close the cover, and your food will bask in the ambient heat (and smoke) inside the chamber. You will find that by configuring your hot coals in this Two Zone configuration, you have created a temperature gradient varying from ‘hot as hell’ on one side of the grill to merely warm on the other.
Another approach, best used for larger cuts of meat such as whole chickens, a turkey, or a roast, is to group the hot coals on either side of the barbecue and cook the food in the center of the grill, flanked by—but not directly over—the hot coals. Food then cooks evenly from all sides. The hinged grill allows you to add additional charcoal, as needed, to maintain the desired temperature. In this configuration, a few handfuls of sawdust or some hardwood kindling (in a foil packet) placed on top of the hot coals will magically turn your little kettle into a smoker. What could be simpler?

A Word From The Editor
Congratulations if you've made it this far. Hopefully, charcoal grilling becomes an event beloved by you, and those who join you at your table. While becoming (re)acquainted with a Weber barbeque may seem a daunting task to some, please take a moment to breathe, and remember we all have to start somewhere. Howie's beloved adage seems particularly pertinent to this Recipe of The Month, to paraphrase:
To cook something well, do it ten times, to cook something great, do it a hundred times.
I'd like to note that the chicken described in this recipe makes for excellent leftovers' sandwiches, especially between two slices of toasted ciabatta with mayo, Dijon mustard, and arugula with a squeeze of lemon and a glug of olive oil. Happy cooking to you all!
From,
The Editor, L.B.

If you have questions, comments, or suggestions, we’d love to hear from you.
Shoot us an email at info@howiesartisanpizza.com.
Make these recipes yourself at home and let us know how it went!
Tag us on Instagram

